
Easter is just around the corner! Are you thinking about sewing an Easter dress? If you're looking for a unique touch, why not try adding box pleats to the skirt of an Oliver + S Fairy Tale Dress? Shelley is here to guide you through the process step-by-step. Let’s dive into her tutorial!
The idea for this project came from a discussion in the forums about pleating the skirt of the Fairy Tale dress. Sandra, who inspired the project with her stunning pleated version, had mentioned the challenge of creating box pleats. This sparked my curiosity, and I decided to experiment.
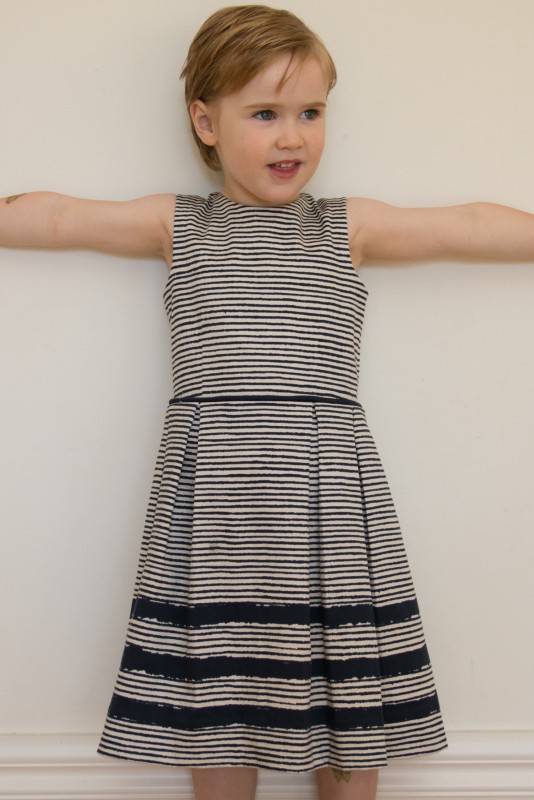
I started by sketching out my ideas and measuring everything carefully. My goal was to create two box pleats on each side of the skirt—front and back—so that the center back remained open for the zipper. After determining the ideal depth for the pleats, I adjusted the width of the skirt accordingly. To my surprise, the fabric width I chose turned out to be perfect for my design.
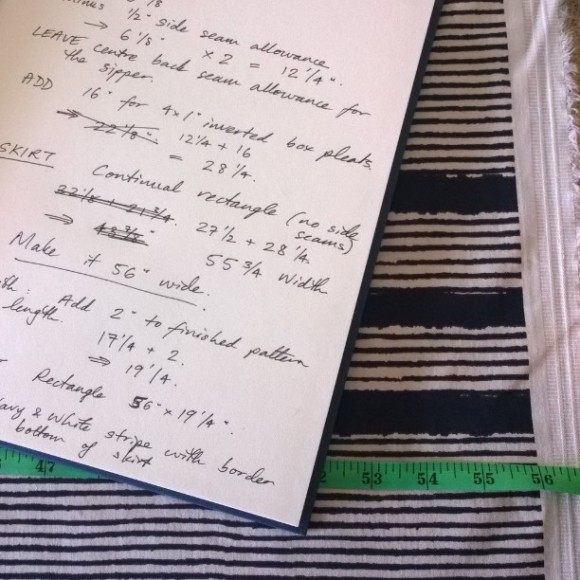 What happened next was truly unexpected: the box pleats aligned almost perfectly with the bodice darts. While this was unplanned, it got me thinking—it should have been intentional! Here's how I calculated the precise measurements to ensure success, regardless of whether you're working under "lucky" or "cloudy" conditions.
Rather than simply providing the numbers, let me walk you through my process. Understanding the math behind it will help if you're customizing your own dress or planning a single box pleat on a different pattern. Recently, Sarvi reached out with a similar math query, and visuals really helped clarify things.
For any pleat, remember that the fabric folds create three layers. Two of those layers aren't accounted for in the initial pattern measurements, so you'll need to add twice the depth of your pleat to the skirt pattern. Think of a box pleat as two opposing pleats, which means you'll need four times the depth of the pleat for each box pleat.
If the skirt pattern doesn't involve gathering, you can directly add the extra inches to the pattern piece. However, with patterns like the Fairy Tale dress, you'll need to start with the finished bodice width and then add the additional fabric for the pleats.
Deciding the depth of the pleats requires balancing aesthetics and fit. I aimed for a pleasing look while keeping the pleats slightly off the hips. After calculating the distance from the side seam to the first pleat, I measured the finished bodice widths across all sizes and determined the necessary adjustments.
Here’s the table you can use to create a new skirt pattern piece. Measure the height of the Fairy Tale skirt pattern for your desired size and match it with the corresponding width. Once you've created the new pattern piece, cut it just as you would the original. If you have wide fabric, cutting it as one large rectangle might be more efficient.
What happened next was truly unexpected: the box pleats aligned almost perfectly with the bodice darts. While this was unplanned, it got me thinking—it should have been intentional! Here's how I calculated the precise measurements to ensure success, regardless of whether you're working under "lucky" or "cloudy" conditions.
Rather than simply providing the numbers, let me walk you through my process. Understanding the math behind it will help if you're customizing your own dress or planning a single box pleat on a different pattern. Recently, Sarvi reached out with a similar math query, and visuals really helped clarify things.
For any pleat, remember that the fabric folds create three layers. Two of those layers aren't accounted for in the initial pattern measurements, so you'll need to add twice the depth of your pleat to the skirt pattern. Think of a box pleat as two opposing pleats, which means you'll need four times the depth of the pleat for each box pleat.
If the skirt pattern doesn't involve gathering, you can directly add the extra inches to the pattern piece. However, with patterns like the Fairy Tale dress, you'll need to start with the finished bodice width and then add the additional fabric for the pleats.
Deciding the depth of the pleats requires balancing aesthetics and fit. I aimed for a pleasing look while keeping the pleats slightly off the hips. After calculating the distance from the side seam to the first pleat, I measured the finished bodice widths across all sizes and determined the necessary adjustments.
Here’s the table you can use to create a new skirt pattern piece. Measure the height of the Fairy Tale skirt pattern for your desired size and match it with the corresponding width. Once you've created the new pattern piece, cut it just as you would the original. If you have wide fabric, cutting it as one large rectangle might be more efficient.
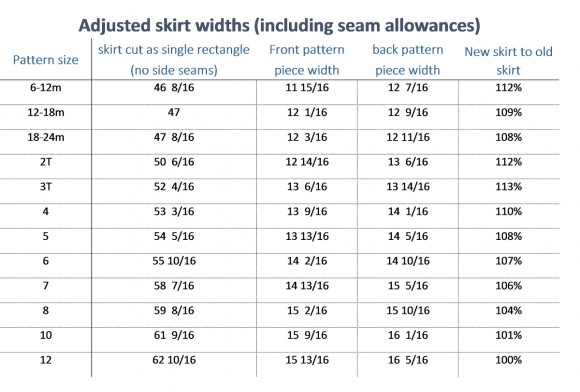 Curious about how the new pattern compares to the original? It’s slightly fuller across most sizes, though not significantly so. Either the new or original pattern piece will work well for the tulle and lining.
Once you've cut the skirt pieces, it's time to mark the placement of the box pleats. If you're using a continuous rectangle, first locate the "side seam" by folding the fabric in half. Mark half an inch from the center back edges for the zipper seam allowance. The midpoint between these marks indicates where the side seam would be if you were joining two panels.
Here’s how the pleat markings will appear:
Curious about how the new pattern compares to the original? It’s slightly fuller across most sizes, though not significantly so. Either the new or original pattern piece will work well for the tulle and lining.
Once you've cut the skirt pieces, it's time to mark the placement of the box pleats. If you're using a continuous rectangle, first locate the "side seam" by folding the fabric in half. Mark half an inch from the center back edges for the zipper seam allowance. The midpoint between these marks indicates where the side seam would be if you were joining two panels.
Here’s how the pleat markings will appear:
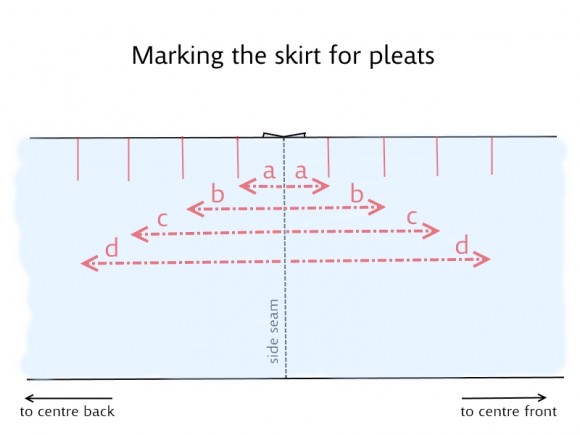 Mark each pleat about 2 inches long using fabric chalk or an erasable pencil. Box pleats are formed by aligning the fabric’s right sides such that the marked lines meet: "a" meets "b," and "c" meets "d."
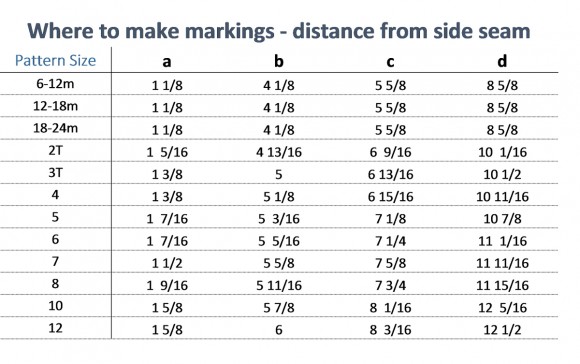
Refer to the table below for precise measurements from the side seam.
Mark each pleat about 2 inches long using fabric chalk or an erasable pencil. Box pleats are formed by aligning the fabric’s right sides such that the marked lines meet: "a" meets "b," and "c" meets "d."
Refer to the table below for precise measurements from the side seam.
 To sew the pleats, bring the corresponding lines together with the fabric’s right sides facing. Baste along the marked line, press the stitched line and fold. Align the pressed crease with the basting stitches and flatten the pleat. Pin in place as you go, and baste along the top edge of the skirt 3/8" from the edge to secure the pleats neatly before attaching the skirt.
Sewing the rest of the dress follows the pattern instructions. I tested the method with interfacing and a stapler on various sizes, and it worked within a sixteenth of an inch. For peace of mind, adding piping at the waist can subtly mask any small discrepancies.
To sew the pleats, bring the corresponding lines together with the fabric’s right sides facing. Baste along the marked line, press the stitched line and fold. Align the pressed crease with the basting stitches and flatten the pleat. Pin in place as you go, and baste along the top edge of the skirt 3/8" from the edge to secure the pleats neatly before attaching the skirt.
Sewing the rest of the dress follows the pattern instructions. I tested the method with interfacing and a stapler on various sizes, and it worked within a sixteenth of an inch. For peace of mind, adding piping at the waist can subtly mask any small discrepancies.
 This project reminded me why I love sewing puzzles. I hope my explanation was clear and engaging—feel free to reach out with questions. I may not have all the answers, but I'm enjoying every moment of learning and experimenting.
Happy Easter,
Shelley
This project reminded me why I love sewing puzzles. I hope my explanation was clear and engaging—feel free to reach out with questions. I may not have all the answers, but I'm enjoying every moment of learning and experimenting.
Happy Easter,
Shelley
What happened next was truly unexpected: the box pleats aligned almost perfectly with the bodice darts. While this was unplanned, it got me thinking—it should have been intentional! Here's how I calculated the precise measurements to ensure success, regardless of whether you're working under "lucky" or "cloudy" conditions.
Rather than simply providing the numbers, let me walk you through my process. Understanding the math behind it will help if you're customizing your own dress or planning a single box pleat on a different pattern. Recently, Sarvi reached out with a similar math query, and visuals really helped clarify things.
For any pleat, remember that the fabric folds create three layers. Two of those layers aren't accounted for in the initial pattern measurements, so you'll need to add twice the depth of your pleat to the skirt pattern. Think of a box pleat as two opposing pleats, which means you'll need four times the depth of the pleat for each box pleat.
If the skirt pattern doesn't involve gathering, you can directly add the extra inches to the pattern piece. However, with patterns like the Fairy Tale dress, you'll need to start with the finished bodice width and then add the additional fabric for the pleats.
Deciding the depth of the pleats requires balancing aesthetics and fit. I aimed for a pleasing look while keeping the pleats slightly off the hips. After calculating the distance from the side seam to the first pleat, I measured the finished bodice widths across all sizes and determined the necessary adjustments.
Here’s the table you can use to create a new skirt pattern piece. Measure the height of the Fairy Tale skirt pattern for your desired size and match it with the corresponding width. Once you've created the new pattern piece, cut it just as you would the original. If you have wide fabric, cutting it as one large rectangle might be more efficient.
Curious about how the new pattern compares to the original? It’s slightly fuller across most sizes, though not significantly so. Either the new or original pattern piece will work well for the tulle and lining.
Once you've cut the skirt pieces, it's time to mark the placement of the box pleats. If you're using a continuous rectangle, first locate the "side seam" by folding the fabric in half. Mark half an inch from the center back edges for the zipper seam allowance. The midpoint between these marks indicates where the side seam would be if you were joining two panels.
Here’s how the pleat markings will appear:
Mark each pleat about 2 inches long using fabric chalk or an erasable pencil. Box pleats are formed by aligning the fabric’s right sides such that the marked lines meet: "a" meets "b," and "c" meets "d."
Refer to the table below for precise measurements from the side seam.
To sew the pleats, bring the corresponding lines together with the fabric’s right sides facing. Baste along the marked line, press the stitched line and fold. Align the pressed crease with the basting stitches and flatten the pleat. Pin in place as you go, and baste along the top edge of the skirt 3/8" from the edge to secure the pleats neatly before attaching the skirt.
Sewing the rest of the dress follows the pattern instructions. I tested the method with interfacing and a stapler on various sizes, and it worked within a sixteenth of an inch. For peace of mind, adding piping at the waist can subtly mask any small discrepancies.
This project reminded me why I love sewing puzzles. I hope my explanation was clear and engaging—feel free to reach out with questions. I may not have all the answers, but I'm enjoying every moment of learning and experimenting.
Happy Easter,
ShelleyFlame Retardant Clothing,Fire Retardant Overalls,Fire Retardant Coveralls,Flame Resistant Coveralls
Changzhou Xinzhi Chain Information Technology Co.Ltd , https://www.czczxzlkj.com